Social Auth Setup
After you have setup the server, you will probably want to setup social
auth to be able to log in using an external service. This setup is required
for end-users so they can self register. If you are setting this up on
localhost, use GitHub or Twitter.
Integration with GitHub
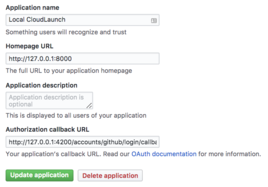
- Register your server with GitHub: Visit your Github account Settings →
Developer settings and add a new
OAuth application. Settings should look as in the following screenshot. Note
port 4200 on the Authorization callback URL; this needs to match the port on
which the CloudLaunch UI is served (4200 is the default). Also take note of the
Client ID and Client Secret at the top of that page as we’ll need that back
in CloudLaunch.
- Back on the local server, login to Django admin and change the domain of
example.com in Sites to
http://127.0.0.1:8080. To login to Admin, you’ll
need the superuser account info that was created when setting up the server.
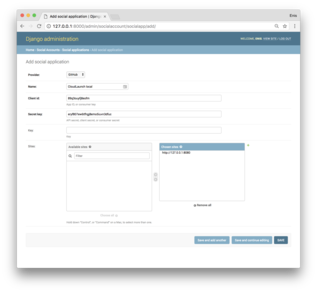
- Still in Django Admin, now navigate to Social Accounts → Social
applications and add a new application. Select GitHub as the provider, supply a
desired application name, and enter the Client ID and Client Secret we got
from GitHub. Also choose the site we updated in Step 2.
Save the model and integration with GitHub is complete! You can now log in to
the CloudLaunch UI using Github.
Social Auth Setup
After you have setup the server, you will probably want to setup social auth to be able to log in using an external service. This setup is required for end-users so they can self register. If you are setting this up on localhost, use GitHub or Twitter.
Integration with GitHub
http://127.0.0.1:8080. To login to Admin, you’ll need the superuser account info that was created when setting up the server.Save the model and integration with GitHub is complete! You can now log in to the CloudLaunch UI using Github.
Integration with Twitter